3. Terminology
Image Co-Tracker is a tool for creating databases of images from the Internet. An image catalog should be created for each database. This catalog can be renamed or deleted.
Within the image catalog, you can define groups of images and image-related information, called categories to better organize your images. Categories can be transfered to other computers, sent by e-mail, published as HTML page, renamed, moved, or deleted.
The grabbed image and certain information about it are captured automatically (such as name, Internet location and date added to the database). The user can edit this information, as well as add supplementary comments and assign a category.
Both the grabbed image and image-related information is called Image Co-Tracker records (or simply records).
Some images can have multiple links. The image is divided into several zones, and each has its own address called URL - Uniform Resource Locator (e.g., the map of the U.S. could have 50 URLs, one for each State). Image Co-Tracker allows you to store these multiple links and retains the “image map” that links each address to its particular zone on the image. However, if you are editing the multiple URL it will be replaced with the single URL you entered.
3. Working with Image Catalogs
Image Co-Tracker provides the following features for managing image catalogs:
1. Creating new catalogs
2. Opening existing catalogs
3. Saving the existing catalog with another name
Creating Image Catalogs
Image catalog is a folder that contains your image database. To create a new image catalog:
1. Click  the Create New Image Catalog button or select Catalog->New from the menu. The New Image Catalog window will appear
2. Select a folder for new data. By default a new catalog will be created at the same level of the folders tree as the current catalog. The default name of an image catalog will be "Image Co-Tracker". To change it enter a new name in the edit box. To allow you to differ the Image Co-Tracker catalogs a newly created catalog will have an .ic extension.
3. Enter the name of the subfolder in the edit box (or use the default)
4. Click OK.
Opening Image Catalogs
To open an image catalog:
1. Click  the Open Image Catalog button or select Catalog->Open from the menu. The Open Image Catalog window will appear
2. Select a folder that contains the image catalog you want to open
3. Click OK.
Saving the Existing Catalog with Another Name
To save the current image catalog with another name:
1. Click  the Save Image Catalog As... button or select Catalog->Save As from the menu. The Save Current Data As window will appear
2. Select a folder where you want to save the current image catalog. By default a catalog at the same level of the folders tree as the curent catalog will be saved. The default name of an image catalog will be the same as the current category. If "All categories" was selected the default name will be "Image Co-Tracker.ic". To change it enter a new name in the edit box.
3. Enter the name of the subfolder in the edit box or leave the default one
4. Click OK.
Displaying Options
Image Co-Tracker allows you to show or hide particular fields and select some other settings. To control how records are displayed:
1. Click  the Options button or select Tool->Options from the menu
2. Check the fields you want to show. By default, all fields are shown. The Options dialog box also contains two additional check boxes. The first lets you choose whether the program asks for confirmation whenever you delete an image. The second allows you to set all images in the database to a standard size of 60x40 pixels
3. Click OK.
4. Working with Image Categories
Image Co-Tracker allows you to organize records within the database in specified groups called categories. For example, you might organize your records by type (family photos, comics, banner ads, etc.) or by purpose (home, office, business, etc.). You can define as many categories as you want. If you do not define any categories, or if you do not select a category for a particular image, Image Co-Tracker will use a default category, called Common. Note that the Common category cannot be deleted.
Creating a New Category
A category is a specific group of images and image-related information within the image catalog. To create a new category:
1. Click  the New Category button or select Category->New from the menu
2. Enter a category name in the edit box
3. Press Enter.
After you have created a new category it will appear in the Category drop-down list in the toolbar and Grab Image window.
Renaming the Existing Category
To rename the existing category:
1. Select the category you want to rename in the category drop-down list
2. Click  the Rename Category button or select Category->Rename from the menu
3. Enter a new name in the edit box
4. Press Enter.
Changing the Order in the Category List
To change the order of the categories in the drop-down category list:
1.Click  the Choose Order in Categories List button or select Category->Choose Order from the menu
2. Position the mouse pointer on the category you want to move
3. Press and hold the left mouse button
4. Drag the category to a new location
5. Release the left mouse button
6. Click OK.
Deleting a Category
To delete a category:
1. Select the category you want to delete in the category drop-down list
2. Click  the Delete Category button or select Category->Delete from the menu
3. Click OK in the confirmation window
Deleting a category will also delete all records the category contains. If you want to keep these images, move them to a different category before deleting the old one!
Following the Link Associated with the Image
Image Co-Tracker captures two types of Internet addresses associated with an image.
The first one indicates the location of the Web page where the image has been found. It is shown in the the "From" field.
The second one is the location where the image refers (e.g. banner ads). It is shown in the "Refers to" field. Not every image has this kind of address, so the field may sometimes be empty. If an image does not have it, you can copy the location where the image has been found into this field, giving you just one more way to access the Web site where you found the image.
Export/Import Categories
The program allows you to work with Image Co-Tracker databases created at other computers. You can both export a particular category and the whole database. Cogitum LC has developed a special file format for this purpose. The ICT file provides an “interface” between the two computers, as shown below:
To export your category for working at other computers:
1. Select a category you want to export in the drop-down list. If you want to export the whole database select "All Categories"
2. Click  the Export button or select Tools->Export from the menu. The Export window will appear
3. Select a folder where you want to save the exported file
4. By default a file with the same name as the current category will be created. If "All categories" was selected the file with the same name as the current image catalog will be created. To change the name of the file enter a new name in the Filename edit box.
5. Click Save
To work with categories created at other computers:
1. Click  the Import button or select Tools->Import from the menu. The Import window will appear
2. Select a file you want to import
3. Click Open
.
4. Select a folder where you want to store the imported catalog. By default a catalog with the same name as the imported file will be created. To allow you to differ the Image Co-Tracker catalogs an imported catalog will have an .ic extension.
5. Click OK
Send a Category by E-mail
Image Co-Tracker allows to send both a particular category and the whole database by e-mail. Before sending Image Co-Tracker will automatically creates an ICT file and attaches it to the message. To send a category by e-mail:
1. Select a category you want to send by e-mail from the drop-down list. If you want to send the whole database select "All Categories"
2. Click  the Send by E-mail button or select Category->Send by E-mail from the menu.
3. Select a mail program from the menu. A file with the same name as the current category will be created automatically. If "All categories" is selected a file with the same name as the current image catalog will be created. Then the mail program will be launched and the created file will be attached to your message.
4. Fill in the rest of your message and send it.
Export a Category to HTML File
Image Co-Tracker lets you export both a particular category and the whole database into an HTML file, which you can then publish at your Web site. To publish a category to an HTML file:
1. Select a category you want to publish as HTML in the drop-down list. If you want to publish the whole database select "All Categories"
2. Click  the Publish in HTML File button or select Category->Publish in HTML from the menu
3. Select the folder to which you want to save the category.
By default a file with the same name as the current category will be created. If "All categories" was selected the file with the same name as the current image catalog will be created. To change the name of the file enter a new name in the Filename edit box.
4. Check the fields you want to show in the HTML file
5. Click OK.
5. Working with Image Records
Editing Image Co-Tracker Records
Image Co-Tracker provides editing of any field contains image-related information except date of adding to the database and the Internet address where an image has been found.
To edit a field:
1. Click the Change command next to the appropriate field.
2. Enter a new value or edit it in the appeared edit box. If you are changing a category select it in the drop down list
3. Press Enter
Please note if you are editing the multiple links (so called multiple URL) it will be replaced with the single link you entered
Sorting Image Co-Tracker Records
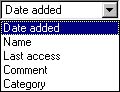
Image Co-Tracker allows you to sort records in your image catalog according to various criteria: by date, by name, by last access, by comment, and by category. The date-related sorts (date the image was added to the catalog and date of last access) will show the images in order from most recent to oldest. The alphabetical sorts (by name, category, or comment) will sort in alphabetical order.
To sort Image Co-Tracker records, simply select the desired type of sort from the drop-down list.
Moving Records to Another Category
To move a record to another category:
1. Click on the Change command next to the "Category" field.
2. Select a new category in the drop down list.
Searching an Image Catalog
To find information in an image catalog:
1. Click  the Search button or select Tools->Find from the menu
2. Enter the text you wish to search for:
- Match whole word only. Check this field if you want to find whole words only (for example, if you are looking for the word “ground,” the program will not consider the word “groundhog” a match).
- Match case. Check this field if you want the search to be case sensitive (e.g., a search on “dog” will not consider “DOG” a match).
- Direction. Choose the direction of search relative to the current cursor location.
3. Press the Find Next button to begin the search
Printing Records
Image Co-Tracker allows you to print your records (images and image-related information). You can print an individual records (or group of records), a particular category, or the whole image catalog.
To print a particular record or a group of records:
1. Select a record or group of records you want to print:
a. Position the mouse pointer at the beginning of the record you want to print
b. Press the left mouse button
c. Move the mouse pointer to the end of the last record you want tp print
d. Release the left mouse button
Please note if you don't select any of the fields these fields won't be printed.
2. Click  the Print button or select Category->Print from the menu. This opens a standard Windows print dialog box.
3. Choose "Selection" radio box in the Print Range
4. Click OK
To print a category:
1. Select a category you want to print. Select "All categories" if you want to print the whole image catalog
1. Click the Print button or select Category->Print from the menu. This opens a standard Windows print dialog box.
3. Click OK
You can also print all the Web pages your images refers to as well as a table of the references. To print these documents check Print all linked documents and/or Print table of links on.
Deleting Records
Image Co-Tracker allows you to delete individual records or all records from an image catalog. To delete a particular record:
1. Click the Delete button next to the image
2. Click OK (if you have set the Image Co-Tracker options to require confirmation).
To delete all the records from the current catalog:
1. Select the Tools ->Delete All… option from the menu
2. Click OK in the confirmation window.